Welcome to our next mini series of our #LarrysLessons! In this series we are going to be covering the MONSTER that is how to paint your CABINETS. This process is extremely rewarding, but don’t let that fool you. It is a large undertaking and is better done by trained professionals. That being said, if you are committed and hard working you can get incredible results if you apply the following steps.
Cabinet painting has been taking off in recent years, due to increased costs of kitchen and bathroom renovations and quickly changing trends/styles in this area. It is simply too expensive and time-costly to keep up with the rapidly changing styles of homes. With social media pushing out new styles and encouraging new purchases, it is important to take a step back and look at what YOU can do to make your life easier. Instead of doing a full gut job, repainting your cabinets will immediately take years off the look of your kitchen or bathroom.
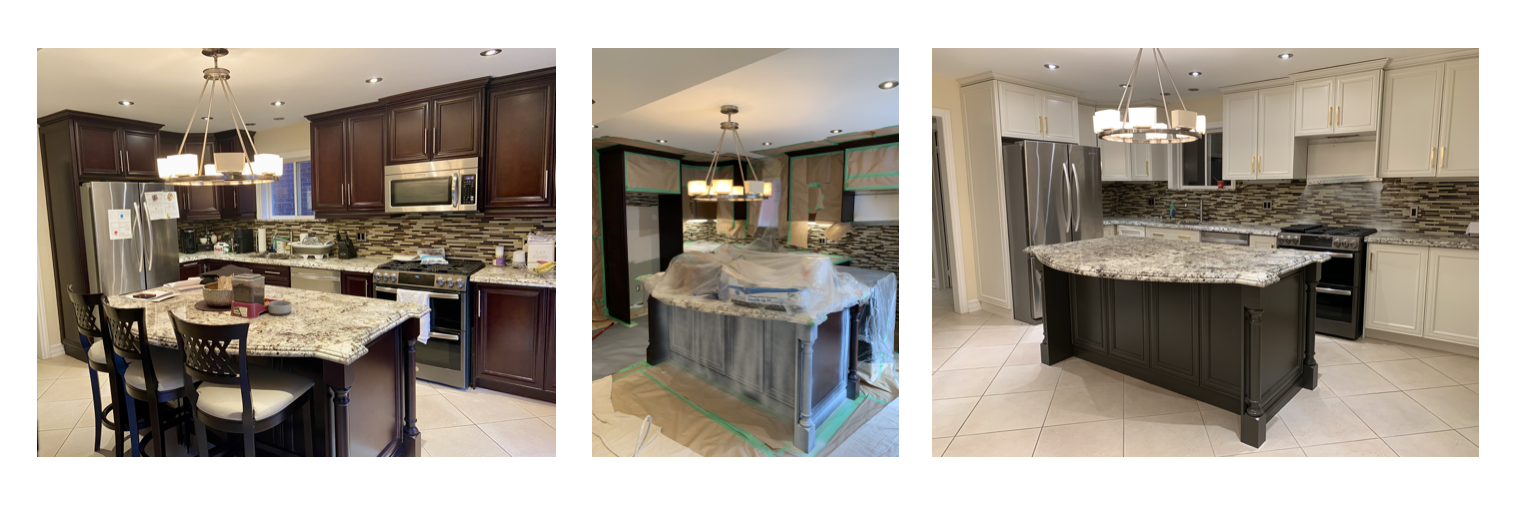
Many homes are stuck in the past with brown, aging cabinets that do not match our current styles. With the follow techniques, you can completely improve the look of your home and bring in some 2023 trends. In this first episode of our CABINET PAINTING series we will cover the PREPARATION steps for cabinet painting. This is extremely important to ensure long-lasting and even paint. Keep reading for our professional tips.
- The first thing you want to do is observe the condition of your cabinets. If they are thoroughly damaged (dented, scrapes, holes, etc.) you may want to bring in a professional for a consultation. Unfortunately, paint is not going to remove the aged and damaged look fully. You don’t want to spend days on this project and wind up with a kitchen paint job that looks so obviously like a “cover up” of damaged wood. If the bones of the cabinets are in relatively good condition, move forward.
- Remove the drawers, doors and hardware. Store the hardware in a plastic bag so you don’t lose them.
- Label them by placing a tape with A,B,C or 1,2,3 on it. Then put an identical tape where the door came from (the cabinet box) so that you know where to put them back at the end of this process.
- Put the doors/drawers aside in an open area such as a basement, garage or spare room, to use as a work space. Ensure you have drop cloths and plastic available to protect your floors, walls and furniture. While doing this whole process, you should be in a well ventilated area (open a window or turn on a fan) because the paint we usually use for cabinets is a bit stronger, smells more and is a bit more toxic!
- Wipe down the cabinets with a soapy water (you can mix water with dish soap) and a sponge/cloth. If needed you can also use a good degreaser solution. There are some on the market like “Goof-Off” or “Dynamic”. You do this to rid them of the dirt and grease that may have built up over the years, ensuring a clean surface, allowing the paint to stick. A good degreaser can be found at paint and hardware stores.
- Take a look over the cabinets and observe any imperfections that will need filling (scuffs, scrapes, etc.) Take a wood filler, apply it, smooth it over with a putty knife and let it dry per the manufacturers instructions.
- If you are planning on using the same hardware you can leave the existing holes as they are. If you plan to change the hardware, and the screw pattern is different than the previous ones, you will need to cover one of the holes with a two-part polyester wood or autobody filler. Apply it, let it sit for about 5 minutes and scrape the excess with a sharp paint scraper and drill a new hole that will fit the new hardware.
- Lay down a drop cloth over the counters or plastic so that paint doesn’t get on it.
- Sand all surfaces that will be painted (e.g. cabinet boxes, drawer faces and doors) lightly with a fine sanding paper or sponge. This will allow for proper adhesion of the paint.
- Wipe down the cupboards to remove sanding dust. You can use a duster or a vacuum and then a tack cloth.
- Tape walls and any other areas that you will not be painting.
- Using a bonding primer, available at hardware and paint stores, apply one even coat on all surfaces. Follow the manufacturer’s instructions, but it is typical to allow to dry for 24 hours. This will allow paint to stick to surfaces that are glossy and resistant to adhesion (like laminate, glass, ceramic, etc.).
- Some enamel paints will stick to laminate and lacquer surfaces without primer. In this case, no primer is needed. (Check with a professional painter or paint store.)
- CONDITIONAL If the cabinets have been previously painted a bonding primer is not necessary. Just prep and go to the painting step. However, if the previous paint job is peeling and failing, it will need to be stripped off, re-primed and then painted. You would strip by using a paint stripper or heat gun, and following the manufacturer’s instructions.
You are now ready to paint!!!
Now that we have prepared the cabinets fully, we can get started with painting. Stay tuned for this next step in our Cabinet Painting Mini-Series. Again, please be sure when doing this to thoroughly research before beginning and have the set aside tools, time and space to do so. If you have any hesitation, we highly recommend reaching out to an expert painter who can provide you with guaranteed quality. Our professionals are just a call away so please contact us for a free consultation.
Our contact information:
(416) 690-3890


